Make a 550 Paracord Lanyard or Bracelet
0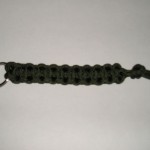 Got some extra parachute cord (aka 550 cord or paracord)? Here’s a project that is both functional, attractive, and handy. Making a paracord lanyard or bracelet is a convenient way to carry a length of 10 feet or so of parachute cord for emergency or survival use.
Following a few simple knot tying methods, you can easily create a bracelet or lanyard out of 550 cord for camping, survival preparedness and as an attractive key fob.
Why Paracord? Used in parachutes for the military, this tough string has a tensile breaking strength of 550 lbs! Furthermore, it is composed of 5 or 7 inner strands that are very strong on their own and well suited to making a make-shift fishing line in an emergency or survival situation. It is also made of nylon so it is lightweight and resists mold and mildew.
Where to get parachute cord? Online or military surplus outlets. Note that there is alot of knock-off paracord available, that may serve fine for a bracelet, but might not have stength needed for camping or survival use. So be sure to check for a military rating if you intend to have it on hand for emergencies.
There are several styles of braid that you can use, but I used the method described here: http://www.theprepared.com/index.php?option=com_content&task=view&id=80&Itemid=49
DIY Weather Monitor Forecaster and Recorder
0Okay, this one’s intense, but the result is stunning. Do you like weather? Do you like to know the forecast and keep track of barometric pressure changes and temperature. Here is a spectacular DIY creation – a DIY Weather Recorder: http://www.qsl.net/ve2emm/pic-projects/wter_rec/weather.html
How to make a PIC-based electronic combination lock
0Here’s an awesome DIY electronic project for those of you who know some PIC programming. Based on the 16F84 PIC microcontroller, an 8-bit microcontroller in the PIC family from Microchip, this project makes a simple DIY circuit that checks for combination of button presses to perform an action, such as unlock a door. With slight modifications this project should be adaptable to the more widely available 16F88 with integrated oscillator. There’s also a newer version for the PIC 16F628 with an optional lcd output.
Check it out at: http://jap.hu/electronic/combination_lock.html.
If anyone tries it out, let me know how it works out and anything you learn in the process.
DIY Tool Review: Irwin Quick-Grip 59400CD 4-Inch Handi-Clamp
1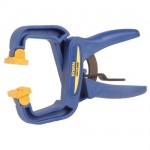 Today, we’re looking at a tool I recently got to help make cuts on the projector project, the Irwin Quick-Grip 59400CD 4-Inch Handi-Clamp.
The Pros: Simple to use; if you can squeeze, you already know how to use it. Padded gripping surface.
The Cons: Mid-price at under 10 dollars. not the cheapest clamp, but probably one of the most useful and versitile clamps. Grip seems slightly weak.
The Review: Overall 3.8/5.0 – I used this clamp to hold light firring strips to a table to make cuts with my circular saw and it was more than enough when combined with a light grip on the board with my free hand. While the clamp initially seemed to have a weak grasp, it’s ease of use and operation makes up for it. Also, in practice the Irwin Quick-Grip Handi-Clamp proved to be a sturdy tool, perhaps only limited by my own grasping strength. With padded gripping surfaces and easy release mechanism, you’ll find plenty of uses for this clamp–and you won’t need to worry about marring finish surfaces. It is an excellent clamp for the price. It really is a “handy clamp” and makes an excellent addition to the DIY toolbox.
Anyone else use this clamp? Like it? Hate? Is there another you’d recommend?
Make Your Own DIY Stud Finder
1Lost your stud finder and need to hang some shelving? Need a cheap Stud Finder? Why not DIY? Today’s cool DIY trick comes from: http://garages.about.com/od/toolsmaterials/qt/DIYstudfinder.htm
As you may know, there are many styles of stud finders out there, and most people prefer the simple, electronic Zircon-style that use battery power to measure the depth. But if you looked in your parent’s (or grandparent’s) toolbox, you might find a very different stud finder. One that used a rare earth magnet to detect the screws or nails attaching the drywall to studs.
Well, if you find yourself with out a proper stud finder, you can fashion own DIY Stud Finder from a simple rare earth magnet and any sort of handle you have on hand. Simply glue the magnet to your handle and drag lightly across the wall until you feel the pull. Simple and effective.

How to Make a $20 DIY Projector Screen
1Got a good lcd or dlp projector? Do you want to know how to make your own cheap projector screen / diy projector screen? Here’s how (these directions make a 3:4 screen with approx 80 inch diagonal–adjust to your own specifications):
What you need:
- Two (2) yards of 54″ white/white budget blackout cloth – from joann.com – normal price $5.99/yd ($2.99 with 50% coupon code from retailmenot.com) Total: $5.98+shipping/tax= $14
- Three (3) 1″x3″x8′ firring strips from Home Depot – $1.34/ea Total: $4.02+tax = $5
- 20 or so 1/2″ wood screws, Total: $1
- Scrap 1/4″ plywood, 1 sq ft is enough Total: Free
- Staple Gun with staples (assume you have this already, if not, I got the Arrow Fastener T50 Heavy Duty Staple Gun
for about $20)- it’s a workhorse, built to last
- Saw
- Hammer
- Straight edge
- Tape measure
Steps:
- Start by measuring the firring strips to the appropriate lengths. To make an 80 inch diagonal 3:4 ratio DIY projector screen, you’ll need two 43″ lengths (sides) and two 64″ lengths (top and bottom).
- Cut the firring strips to the measured lengths
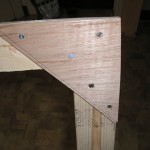
- Cut 4 right angle triangles from the plywood, large enough to support the corners.
- Attach the plywood triangles to the corners of the frame using the wood screws, being sure to attach the screws so as to secure the frame tightly in place.
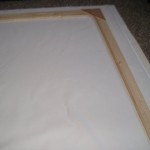
- Unroll the blackout cloth, smoother side down on a large, clean carpeted area. Place wooden frame face-down, centered onto the cloth.
- Fold one side up over the frame and staple, starting from the middle and working out. Tap staples down with hammer to tighten grip.
- On the opposite side of the frame, firmly pull the cloth tightly over the frame and staple, again from middle outward, being sure to fix any wrinkles. Once it looks tight and flat, hammer down the staples on this side also.
- Repeat steps 6 and 7 for the remaining sides, being sure pull the cloth as tight as possible by hand.
- Finish the corners with staples to hold the fabric folds.
- (Optional) Cut excess cloth with a utility knife, being sure not to nick your screen.
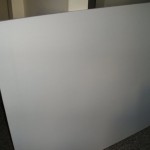
- Hang and project on your new $20 DIY projector screen.
How to Build a DIY 1000 Watt Wind Turbine
0 Today’s projects comes from Instructables — they’ve got a great article on building your very own wind turbine. This DIY project can help you get off the grid and reduce your carbon impact! The article leads you through the steps of:
- building the magnet discs
- building the coil discs
- building the hub assembly
- constructing the blades
- final assembly
Read more at: http://www.instructables.com/id/DIY-1000-watt-wind-turbine/
Best Place to Buy Cheap Electronic Components
0A question I’m frequently asked: “I’d love to make this circuit or DIY electronic project i saw online– but, i went to radioshack and all the stuff costs so much!? Where can I get the components cheap?
Well, sadly as “The Shack” has transitioned away from radio building and into a cell phone kiosk, Radio Shack now charges REDICULOUS prices for simple components. I’m glad to say, with the internet now everywhere, you don’t have to go to the shack and pay these prices. But since online ordering can take some time, its a good idea to plan ahead and stock a parts bin, so you’ll have most of the common components on hand when you see that great DIY electronics project online.
Where do I shop? Well, my favorite for stocking a parts bin is, handsdown, Goldmine Electronics- it is definately the best place to buy cheap electronic components. Be sure to check their clearance and assortments, but definately do a search for “surprise” — nothing could be better for stocking a parts bin!
For around 8 dollars (pricing might have changed) the assortment in their large surprise box was more than enough resistors, capacitors, doohickeys, switches, knobs, for many projects. Because every surprise box is different (though they seem to run in batches), I’d recommend adding one surprise box to your order whenever you find yourself back on their site for some specific parts.
Over the course of time, I’ve received everything from small cell phone lcd screens, to mostly complete cell phones, more snap-in 120v lamps and mono 3.5mm jacks than i could ever know what to do with and lots of other really neat stuff to tinker with.
Basic Tools for Woodworking DIY Projects
0Let’s take a moment to talk about tools you’ll want when you are working on building or woodworking do-it-yourself projects.
You probably already have some things:
- hammer
- screw drivers, phillips and flat head
- basic saw
- pliers, a must for so many projects
- clamps – I recommend the kind you can squeeze to tighten such as Irwin Quick-Grip Bar Clamps
- Tape measure or yard stick
- pipe wrench and/or crescent wrench
- T-square
- level
- sandpaper
But you’ll quickly discover you need other tools and particularly with wood construction some power tools will serve you well. One set that’s comprehensive and has done well for me personally is the: Factory-Reconditioned Ryobi ZRP841 18-Volt Super Combo Kit
At only $129 and free shipping on Amazon, it’s a deal thats tough to beat. With 18V interchangeable batteries, you’ll have all the power you’ll need to cut and drill and drive virtually any project you need, with driver/drill, circ saw, sawz-all style reciprocating saw, and flashlight.
Other items to think about:
- Random orbit sander
- Dremel or similar rotary tool
- Staple gun
- Jig saw
When selecting tools it’s important to take quality into account. While the cheapest tool may be perfectly fine for one or two projects, a higher quality tool may provide years of service. Be sure to factor how often you plan to use a tool and your expectations of tool longevity into your value calculations on a new tool purpose. For larger or single-project-use tools, consider borrowing from a friend or renting from a local home warehouse.
What to do with an old computer?
0A recent book from Randy Sarafan has the answer: 62 Projects to Make with a Dead Computer And Other Discarded Electronics
Broken laptop? Broken Mouse? Broken flat-screen tv? This book addresses it all. why throw all the broken stuff in the trash when you can put it to use. Make something useful and fun with that old junk.
