Posts tagged tool
How to make a Workbench with the Kreg Jig!
0IF you want a nice workbench, you can make one yourself with just a few boards and some basic tools, inlcuding the Kreg Pocket Hole Jig System. Kreg has put together a great video series and here is episode one of how to make a workbench with the kreg jig. It’s a simple plan you can do in an afternoon or adapt to your own project. The video will give you ideas on how to use your kreg jig to build other tables and furniture.
How to Pick a Circular Saw
0Are you looking to purchase a circular saw? Decided that the old handsaw just isnt enough to help build your deck? Here’s how to pick a good circular saw that will do what you need and last a long time. Considerations include:
- Power — you want enough power for the saw to move easily through even the toughest lumber to avoid dulling and heating the blade
- Price — you want a tool that will last but you dont want to spend more than you paid for your car
- Sidewinder or worm-drive — there are differences in torque, but I would recommend picking whichever you prefer the balance on
- Cordless? — Limited run times and lower toque hinder the cordless models, but if you need to use a circ saw away from power, or infrequently for small jobs, these units can be lightweight and portable alternatives to corded models
- Adjustment — look for a model with intuitive adjustment controls that allow you easily change settings
- Know how to use and care for your tool. Be sure to read and follow all of the manufacturer’s instructions. To safely use a circular saw and keep it in top condition for years of reliable use, you need to follow the guidelines.
Plunge versus Fixed Base Router
0A tool that you may want to consider as you start to be come a true woodworker is a router. A router can help you add that professional edge to wood to make your boring woodworking projects suddenly look professional. The key to picking a router that will do what you want and satisfy your needs can be tough, but here are a few things to consider:
- Horse Power. The more powerful the better. You don’t want your router to strain under the load. For a standard use unit, look for 2 HP or more.
- Plunge vs. Fixed Base. While a plunge router allows you to ‘plunge’ as the name implies into the middle of boards and grind out material, a fixed base router is made to follow edges. Consider how you wish you use your router and the projects you may take on.
- A good compromise. Some routers like the Skil 1825-RT 2-1/4-Horsepower 2-Inch Router Combo Kit
combine both a fixed base and a plunge base, making a versitile alternative for beginners and skille craftsmen alike.
Don’t forget you’ll also need a good router bit set.
Projects you can now accomplish with your new router include:
- Cutting out sink holes in counters
- Rounding edges on tables and cabinets, drawer fronts, etc.
- And much, MUCH more.
DIY Tool Review: Kreg Jig Jr. Pocket Hole Jig
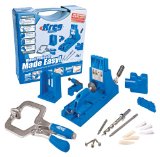
0Today we’re looking at another tool I’ve recently purcahsed for DIY projects around the house, the Kreg Jig Jr. — the slightly smaller and less expensive cousin to the full Kreg Jig Master System
. I saw the ads on TV and had to try it for myself.
Both systems are made by Kreg and offer the ability to drill precision pocket holes to join boards. Pocket hole joints make rigid connections between perpendicular boards, well suited to tables, drawers and other framing applications. The Master System more easily mounts for repeated use and can be adjusted to accommodate larger board thicknesses.
The Pros: Works just like they say! Simple to use. All measurements are done for you! And everything you need (except a power drill) is included, so you can quickly adjust the jig and make your drills. Works very well with only minimal time looking through the users guide.
The Cons: The Kreg Jig Jr. is small and can sometimes be difficult to clamp in place or annoying to unclaim and reclamp between uses — where the master system version would clearly have the advantage.
The Review: 4.8/5.0 Works exactly as they say in the ads. It makes it simple to get professional looking joints that hold together tightly. I was able to quickly repair an Ikea dresser drawer that had started to come apart with just a couple simple holes and screws, set precisely to the right angle and depths by the Kreg Jig. Get the professionally finished appearance most do-it-yourself folk strive to achieve–without much real work!
Can’t wait to use this for another project! Any suggestions? Have you used the Kreg Jig? What did you think?
Instructions on How to Use a Swanson Speed Square
0Today, we’re taking about the Swanson Speed Square. A speed square is an essential DIY tool for woodworking. Invented way back in 1930, the popularity of the Swanson speed square has grown substantially over time.
The speed square is a rafter square, miter square, try square, scribing guide, protractor and, perhaps most usefully, a good saw guide.
Instructions to use a speed square:
As a Saw Guide: You simply hold the speed square base against the lumber and align the guide rail on your circular saw (being sure to keep your hands clear of the blade) to make clean straight cross-cuts.
As a Protractor: Simply hold the base against a flat surface and find the desired angle marking.
To Find Rafter Angles: The primary use is to find the angle for rafters. Calculating the correct angles for a rise to run ratio is simple with trigonometry, but the speed square eliminates the need for a calculator. First, set the pivot at the edge of the board. Next, rotate the square around that point until the edge of the board aligns with the mark you want on the common scale. Mark a line along the ruled side of the square.
The speed square also makes quick work of hips and valley rafters– same method as for common rafters, but use the Hip-Val” scale.
To scribe parallel lines: An often overlooked feature is the scribe feature. The tool provides a set of notches 1/4 inch apart. Set a pencil in the desired notch and slide the square along the board to mark a parallel line.
Be sure to pick one up before your next DIY woodworking project.
DIY Tool Review: Irwin Quick-Grip 59400CD 4-Inch Handi-Clamp
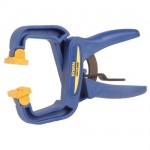
1 Today, we’re looking at a tool I recently got to help make cuts on the projector project, the Irwin Quick-Grip 59400CD 4-Inch Handi-Clamp.
The Pros: Simple to use; if you can squeeze, you already know how to use it. Padded gripping surface.
The Cons: Mid-price at under 10 dollars. not the cheapest clamp, but probably one of the most useful and versitile clamps. Grip seems slightly weak.
The Review: Overall 3.8/5.0 – I used this clamp to hold light firring strips to a table to make cuts with my circular saw and it was more than enough when combined with a light grip on the board with my free hand. While the clamp initially seemed to have a weak grasp, it’s ease of use and operation makes up for it. Also, in practice the Irwin Quick-Grip Handi-Clamp proved to be a sturdy tool, perhaps only limited by my own grasping strength. With padded gripping surfaces and easy release mechanism, you’ll find plenty of uses for this clamp–and you won’t need to worry about marring finish surfaces. It is an excellent clamp for the price. It really is a “handy clamp” and makes an excellent addition to the DIY toolbox.
Anyone else use this clamp? Like it? Hate? Is there another you’d recommend?
