Your guide to DIY electronic, woodworking, camping projects and more
Posts tagged recycled materials
How to install new side-pull caliper brakes on a bike
012 years
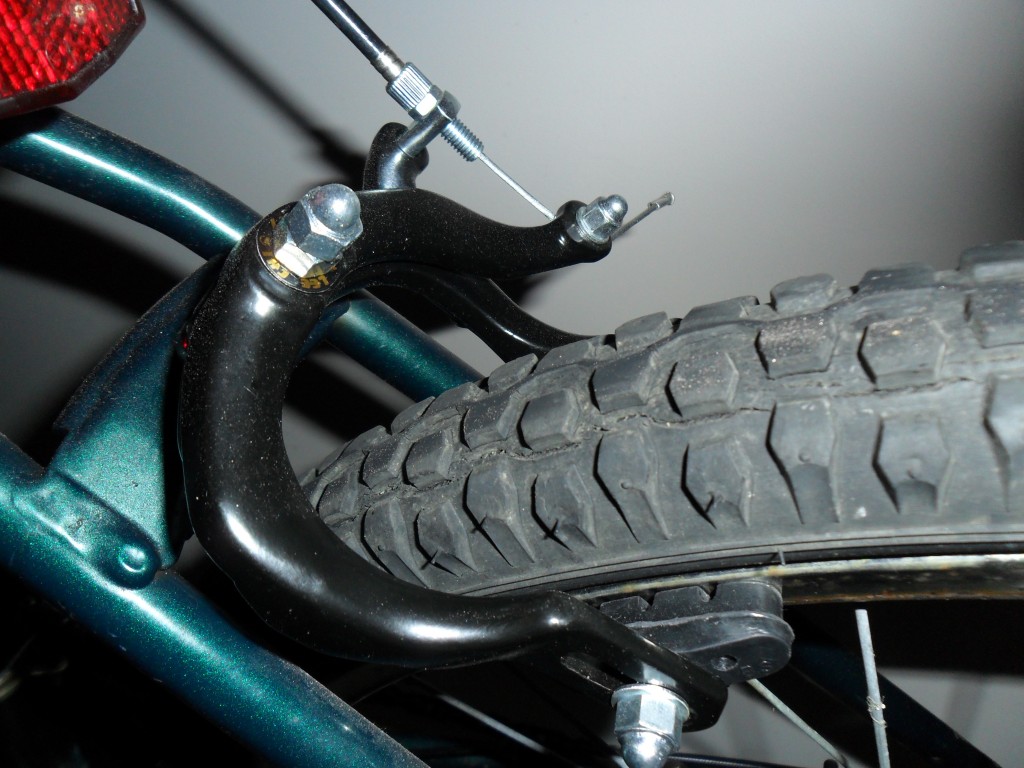 Here’s a simple project just about anyone can do in an hour or so. So you bike brakes won’t stop? Do the brake pads look worn down and uneven? Are the brackets themselves bent out of place? Rusted through?
You can easily replace side-pull caliper brakes yourself and make your bike safe to ride again. Note: properly functioning brakes are important to safe operation of a bicycle. Never operate a bicycle without properly functioning brakes. If you feel uncomfortable with your own ability to safely repair your own brakes, a neighborhood bike shop can do the repair for you.
If you’re interested in making the repair yourself, read on.
Materials:
- Depending on what pieces have failed you’ll need new brake pads and possibly a new caliper mechanism
- This is also a good time to replace your brake cables, that may be fraying, rusting or no longer sliding easily.
- You can get kits like this one that include all the parts for one low price:
Make sure that you purchase the correct components to fit your bicycle. There are several styles of brakes including disc brakes , side-pull brakes
, and V-brakes
. Make sure you purchase the correct size for your type of bike.
Step 1: Remove the old brakes. Start by loosening the bolt that holds the brake cable to the caliper; once removed, you should be able to fully separate the caliper releasing the brake pads from around the bicycle wheel. Next, loosen the bolt that holds the caliper assembly to the frame of the bike and remove the caliper entirely.
Step 2: If you are only replacing brake pads, now is the time to swap your new pads onto the calipers and re-install.
Step 3: If you are are fully replacing your calipers, install the new calipers paying close attention to the fit of the brake pads. You will likely need to adjust the placement of the brake pads to match your bicycle wheel. It’s also a good idea to clean your bike wheel to remove any dirt or grease that might cause problems for proper braking.
Step 4: Once the caliper is reattached, tighten the bolt and thread the brake cable through its place on the caliper. If the cable shows any signs of fraying, it should be replaced.
Step 5: Adjust properly. To properly adjust the brake cable tension, start with the brake lever fully released and the thumb screw adjustment at its lowest setting. Gently hold the brakes close to the wheel and tighten the screw holding the cable to the caliper.
Step 6: Test the brake operations by squeezing the brake lever. The brake should squeeze firmly, but release to allow free movement when the brakes are not applied. Use the thumb screw adjustment to find the right adjustment. Take time to adjust until the brakes operated properly. If you are unsure, consult a bike shop before operating your bicycle.
Step 7: Repeat the same steps to replace your second brake caliper.
Once you’re satisfied that the repair has been made properly, enjoy your handiwork with a relaxing safe ride.
- Replacing side-pull caliper brakes on a bicycle
DIY Audio Cables from Spare Cat5
015 years
Just recently found myself with some spare Cat 5 Cable so I took a look around the net for the best new uses for the old materials… Found a great site that details how to turn your old Cat5 into a high fidelity audio cable. Take your unneeded Cat 5 ethernet cable and make some useful high quality speaker cables. Haven’t tried it yet, but they look awesome- check it out over at http://www.venhaus1.com/diycatfivecables.html
How to Rewire a Lamp
016 years
Do you have an old lamp sitting around the attic or basement that could be cleaned up and used? Is the problem that the electrics looks crazy old and need replacement? If you have an old lamp you want to rewire, you can easily rewire your lamp at home. Do it yourself and save money while saving the old lamp from the dump!
What you need:
- A new Standard Lamp Socket
(assuming the old one is shot/not safe to use)
Or consider an upgrade with a Dimmer Socket - A length of suitable electrical cord – consult your hardware store for proper gauge for your application – for most standard lamps (think 60W or less) and short lengths, most any UL approved cord will do – for longer runs or higher wattage lamps, you will need a heavier gauge cord to prevent overheating
- 2-wire electric plug
to attach cord to wall outlet
How to rewire a lamp:
- Be safe; know what you’re doing. Always consult a professional electrician for any questions. Always unplug any electric appliance before servicing.
- After unplugging the lamp, remove any shade and bulb
- Remove the socket and old wiring. You may need to cut the old wiring to remove. Discard the old parts
- Take your length of new cord and attach the plug. Typically this will involve either stripping the wire and attaching it with screw mounts OR inserting the cord and crimping the cord in some fashion. Consult the directions that came with your new plug for complete instructions
- Feed the free end of your new cord up through the base of your lamp and our through where the old socket attached.
- Separate the two ends and remove a small length of the insulation from each of the two wires. Twist the wire inside tightly.
- Now, take your new socket attach one wire to each of the two terminals of the lamp socket. Usually this is done with screw-down connections. Be sure that the wires attach firmly and are not loose or frayed out. Consult the instructions that came with your new socket for complete directions. You should tie a knot in the cord to keep any tugs from a pulled cord from detaching the connections
- Attach the socket to the lamp, usually screws on to base.
- Final inspection. Ensure all connections are properly attached and insulated, no gashes have been made to cord in the process and all is tightly attached.
- Put a bulb in and try out your new re-wired lamp!
- Consider purchasing new lamp shades
to give new life to an old lamp
Make your own Compost Bin
016 years
For those concerned with the environment, this is a easy DIY project that can yield a beneficial and fast return and can put recycled materials to use. You stop throwing away food and other items that will quickly break down and you gain free, natural fertilizer for plants.
Here’s how to make your own compost bin:
1) Find a plastic storage bin (at least 18 gallons – this could be a recycled garbage can, or other container you already have)
2) To ensure thorough air flow to your compost so that it can properly break down, drill or punch holes throughout the container – 1/4 inch holes every 1-2 inches would be fine, but there are no hard rules here
3) Throw in your compost materials– kitchen scraps, weeds, trimmings, etc. Smaller pieces will breakdown more quickly, so chopping up the compost is recommended.
4) Be sure to adjust the wet/dry ratio so that the compost isn’t too wet or too dry. If you notice your compost seems too moist, adjust the consistency by adding shredded newspaper or saw dust.
5) Place the bin out of the way on a couple of bricks to ensure proper ventilation.
6) Continue to add compost to fill the bin and adjust dampness, turning or shaking the bin daily.
7) After about one month, you can run the compost through a sifter or chicken wire and harvest the final compost.
There you have it–your own free, natural fertilizer, ready to use on your garden.
What to do with an old computer?
016 years
A recent book from Randy Sarafan has the answer: 62 Projects to Make with a Dead Computer And Other Discarded Electronics
Broken laptop? Broken Mouse? Broken flat-screen tv? This book addresses it all. why throw all the broken stuff in the trash when you can put it to use. Make something useful and fun with that old junk.
Frozen Juice Crystal Radio plans
016 years

Frozen Juice Crystal Radio
What you need:
- Empty frozen juice container (I used Welch’s plastic container because it is nice and solid)
- Magnet wire (thin gauge)
- High impedance earphone (see Radioshack)
- Spare board for mounting
- Piece of metal (coat hanger) for “dial”
- Wood Screws
- Tape
- Schottky diode (or germanium-see Radioshack)
- resistor (something in the 10k ohm range should be good)
- sandpaper
1. Cut the end off of the juice container so you are left with a nice plastic cylinder.
2. Leaving 12 inches of wire free, tape magnet wire near the end of container (1/2 inch from edge) and wrap tightly until the coil has grown to at least 2.5 inches and tape other end down, leaving another 12 inch free wire on this end also.
3. Use sandpaper to remove coating from wire to expose a strip across the wound coil.
4. Secure plastic tube to board with screws to keep it from rolling around.
5. Attach each wire from the coil to a separate screw into the board.
6. Attach the diode (direction not important), resistor, and earphone leads as shown.
Attach additional wires on each side as shown–one will become your ground (should be attached to cold water pipe or other ground) and the other will become you antenna.
7. Attach a piece of metal coat hanger so as to press tightly against the exposed strip on the coil. Using this slider, you can tune your radio by adjusting the number of wraps being used.
8. Enjoy your radio!
Soda Can Backpack Stove
116 years
by admin
in Outdoors/Camping
 Here’s a neat little project I just stumbled upon. For those DIYers, this is a useful project if you like backpacking or camping. Constructed from pieces of aluminum soda cans, this versatile camp stove burns alcohol to produce its heat and resuses materials that would otherwise be discarded or recycled.
For my first attempt I carved up a couple of Coke cans paying little attention to making clean cuts and exact measurements and the initial set up was less than successful. However, with a little care, particularly to making clean cuts by peeling the can along scored marks, the second iteration was far more successful and more rigid.
For complete instructions on making your own handy alcohol stove from soda cans, consult: http://zenstoves.net/Stoves.htm. The author discusses various construction practices and fuels used, as well as safety hazards of each design.
The model I constructed (above) is known as a pressurized jet alcohol stove, which uses a metal insert to preheat and vaporize the fuel, pushing it out through the top jets. Open burners and pressure-regulated burners can also be similarly constructed with soda cans, tuna cans, or Altoids tins.