Your guide to DIY electronic, woodworking, camping projects and more
Posts tagged side-pull
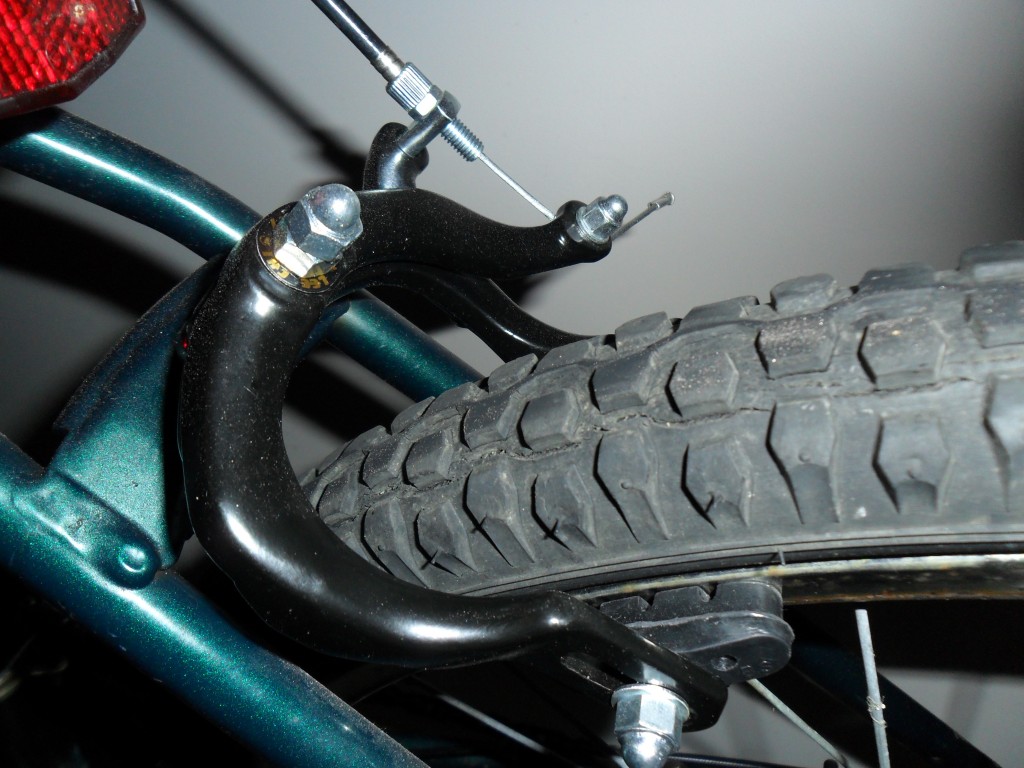
How to install new side-pull caliper brakes on a bike
012 years
 Here’s a simple project just about anyone can do in an hour or so. So you bike brakes won’t stop? Do the brake pads look worn down and uneven? Are the brackets themselves bent out of place? Rusted through?
You can easily replace side-pull caliper brakes yourself and make your bike safe to ride again. Note: properly functioning brakes are important to safe operation of a bicycle. Never operate a bicycle without properly functioning brakes. If you feel uncomfortable with your own ability to safely repair your own brakes, a neighborhood bike shop can do the repair for you.
If you’re interested in making the repair yourself, read on.
Materials:
- Depending on what pieces have failed you’ll need new brake pads and possibly a new caliper mechanism
- This is also a good time to replace your brake cables, that may be fraying, rusting or no longer sliding easily.
- You can get kits like this one that include all the parts for one low price:
Make sure that you purchase the correct components to fit your bicycle. There are several styles of brakes including disc brakes , side-pull brakes
, and V-brakes
. Make sure you purchase the correct size for your type of bike.
Step 1: Remove the old brakes. Start by loosening the bolt that holds the brake cable to the caliper; once removed, you should be able to fully separate the caliper releasing the brake pads from around the bicycle wheel. Next, loosen the bolt that holds the caliper assembly to the frame of the bike and remove the caliper entirely.
Step 2: If you are only replacing brake pads, now is the time to swap your new pads onto the calipers and re-install.
Step 3: If you are are fully replacing your calipers, install the new calipers paying close attention to the fit of the brake pads. You will likely need to adjust the placement of the brake pads to match your bicycle wheel. It’s also a good idea to clean your bike wheel to remove any dirt or grease that might cause problems for proper braking.
Step 4: Once the caliper is reattached, tighten the bolt and thread the brake cable through its place on the caliper. If the cable shows any signs of fraying, it should be replaced.
Step 5: Adjust properly. To properly adjust the brake cable tension, start with the brake lever fully released and the thumb screw adjustment at its lowest setting. Gently hold the brakes close to the wheel and tighten the screw holding the cable to the caliper.
Step 6: Test the brake operations by squeezing the brake lever. The brake should squeeze firmly, but release to allow free movement when the brakes are not applied. Use the thumb screw adjustment to find the right adjustment. Take time to adjust until the brakes operated properly. If you are unsure, consult a bike shop before operating your bicycle.
Step 7: Repeat the same steps to replace your second brake caliper.
Once you’re satisfied that the repair has been made properly, enjoy your handiwork with a relaxing safe ride.
- Replacing side-pull caliper brakes on a bicycle