Computers/Electronics/Tech
Projects that include a focus on technology, computers, electronics, or automation
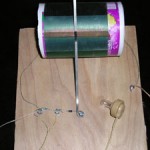
Frozen Juice Crystal Radio plans
0What you need:
- Empty frozen juice container (I used Welch’s plastic container because it is nice and solid)
- Magnet wire (thin gauge)
- High impedance earphone (see Radioshack)
- Spare board for mounting
- Piece of metal (coat hanger) for “dial”
- Wood Screws
- Tape
- Schottky diode (or germanium-see Radioshack)
- resistor (something in the 10k ohm range should be good)
- sandpaper
1. Cut the end off of the juice container so you are left with a nice plastic cylinder.
2. Leaving 12 inches of wire free, tape magnet wire near the end of container (1/2 inch from edge) and wrap tightly until the coil has grown to at least 2.5 inches and tape other end down, leaving another 12 inch free wire on this end also.
3. Use sandpaper to remove coating from wire to expose a strip across the wound coil.
4. Secure plastic tube to board with screws to keep it from rolling around.
5. Attach each wire from the coil to a separate screw into the board.
6. Attach the diode (direction not important), resistor, and earphone leads as shown.
Attach additional wires on each side as shown–one will become your ground (should be attached to cold water pipe or other ground) and the other will become you antenna.
7. Attach a piece of metal coat hanger so as to press tightly against the exposed strip on the coil. Using this slider, you can tune your radio by adjusting the number of wraps being used.
8. Enjoy your radio!
Solar AA Battery Charger
0Harness the power of the sun to power all of your battery-powered devices. In this simple example, I constructed a solar AA battery charger suitable for use with NiCd batteries.
From various internet sources, I read up on the proper ways to charge NiCd batteries. I decided for this initial example to use only NiCd because they are readily available, cheap and typically accidental overcharging simply reduces the batteries lifespan, rather than creating a fire hazard as with a lithium ion. According to several sites, the safe “slow charge” method is to charge the battery with 1/10th of its capacity for 10-12 hours as so-called “overnight” charger do. These charges require the user to keep track of when they began the charge and remove the charger at the appropriate time as they do not incorporate any sophisticated ways to test the charge status.
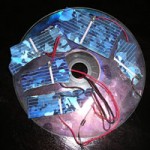
The AA batteries I purchased are rated at 600mAh, so the slow charging method would require roughly 10-12 hours at 60mA. Using some broken solar cells I purchased online, I connected together 5 pieces, in series. Each piece produced roughly 80mA in direct sunlight and roughly .5 volts each (smaller pieces produced less amperage). Connected in series, this produced roughly 2.5 volts at 80mA max (in my tests, indirect sunlight through my window produced roughly 50-70mA – perfectly suited to charging the AA battery.
The voltage was also ideal at 2.5v as to create a voltage differential to ensure energy flowed into the battery (1.2v) even after the voltage drop from the diode. The diode serves one important function in this set up and prevents the batery from discharging during lowlight conditions by ensuring energy only flows into the battery and not back out through the solar cells. The entire assembly is mounted to an old CD-R as a sturdy re-claimed backing. Mounting the battery clip to the bottom provides enough angle to point the solar cells out the window.
While the efficiency of charging only one AA battery in this charger is not ideal, it is an excellent proof of concept and I have tested its ability to fully charge a NiCD AA battery in one sunnny day many times with succeess. For a larger scale, more useful solar device, check out the small solar generator I created next.

