Posts tagged a/v
How to choose video cables for your home theater – Video Cables Comparison
0So you got a sweet lcd screen, or maybe you got a projector and built the DIY Projector Screen ? So now you wanna know how to hook up all your video sources and what cables to use. You also want to know what the differences are between cables and why some cables are cheap and some cables are expensive? do they make a difference? Here’s how to choose the right cables:
First, check what cables you can use. You’ll need a cable the fits the source, such as a dvd player or cable box, as well as the target, such as an lcd tv… There are a number of standards that are used. and here’s a break down:
- RF Coaxial: The cable in your ‘cable tv’ – this was long the standard to bring antenna signals and cable signals into your home and to wire between them once in your home. Most VCRs and DVD players with external RF modulators may use RF coaxial cable to connect to a TV, usually tuned to channel 3 or 4 depending on region.
- Composite: typically a yellow-coded cable with RCA connectors, often matched with a pair of white- and red-coded audio cables. This is found on nearly all VHS players and most dvd players. It is also often included with other non-HD video sources and a basic standard.
- S-Video: a DIN-9 connector on both ends of a cable typically skinnier. This is considered a higher quality connection than the standard composite connection as each color channel is carried separately within the cable reducing any interference between color signals
- Component: Sometimes confused with composite, component video cables use similar RCA connectors and are typically a set of three cables, one for each color channel, or a set of 5 two of which will be standard audio cables. These connectors are better still as each color channel is now contained in its own cable. These cables are also capable of transmitting the higher resolution of HD, so they are a lower-end connector for HD systems.
- DVI: DVI cables were briefly included as a standard on many computers and lcd monitors before being replaced by HDMI cables soon after. Depending on the sources and targets these cables may be used with both analog (DVI-A) and digital devices (DVI-D). for example, some monitors may received analog inputs to their DVI connections through a VGA to DVI adapter, while later devices may receive digital inputs through their DVI connections via an HDMI to DVI adapter.
- HDMI: The modern HD standard, this small connector features fully digital connections betwen source and target and is best suited for High-definition applications and is most likely to be included on your blu-ray player or upscaling DVD player as well as almost all modern LCD or LED HDTVs.
After considering the available options that you can use to connect your components, consider the lengths of cables and costs. RF coaxial cable is probably the cheapest and will perform well over relatively long runs, but it is also the lowest quality picture… Composite cables may yield decent results in short runs of 3 to 6 ft, but will drastically suffer in runs 12ft-25ft or longer unless an extremely high quality 75 ohm cable with shielding is used. S-video may perform better but again, in longer runs, the quality will drop off dramatically. Component cables are likely included on your HD-ready source so this may be a good option, but consider HDMI for longer runs, where it’s available on source and target.

How to Make a $20 DIY Projector Screen
1Got a good lcd or dlp projector? Do you want to know how to make your own cheap projector screen / diy projector screen? Here’s how (these directions make a 3:4 screen with approx 80 inch diagonal–adjust to your own specifications):
What you need:
- Two (2) yards of 54″ white/white budget blackout cloth – from joann.com – normal price $5.99/yd ($2.99 with 50% coupon code from retailmenot.com) Total: $5.98+shipping/tax= $14
- Three (3) 1″x3″x8′ firring strips from Home Depot – $1.34/ea Total: $4.02+tax = $5
- 20 or so 1/2″ wood screws, Total: $1
- Scrap 1/4″ plywood, 1 sq ft is enough Total: Free
- Staple Gun with staples (assume you have this already, if not, I got the Arrow Fastener T50 Heavy Duty Staple Gun
for about $20)- it’s a workhorse, built to last
- Saw
- Hammer
- Straight edge
- Tape measure
Steps:
- Start by measuring the firring strips to the appropriate lengths. To make an 80 inch diagonal 3:4 ratio DIY projector screen, you’ll need two 43″ lengths (sides) and two 64″ lengths (top and bottom).
- Cut the firring strips to the measured lengths
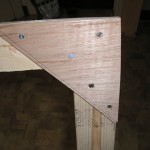
- Cut 4 right angle triangles from the plywood, large enough to support the corners.
- Attach the plywood triangles to the corners of the frame using the wood screws, being sure to attach the screws so as to secure the frame tightly in place.
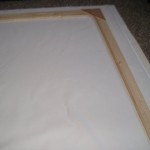
- Unroll the blackout cloth, smoother side down on a large, clean carpeted area. Place wooden frame face-down, centered onto the cloth.
- Fold one side up over the frame and staple, starting from the middle and working out. Tap staples down with hammer to tighten grip.
- On the opposite side of the frame, firmly pull the cloth tightly over the frame and staple, again from middle outward, being sure to fix any wrinkles. Once it looks tight and flat, hammer down the staples on this side also.
- Repeat steps 6 and 7 for the remaining sides, being sure pull the cloth as tight as possible by hand.
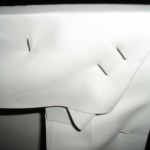
- Finish the corners with staples to hold the fabric folds.
- (Optional) Cut excess cloth with a utility knife, being sure not to nick your screen.
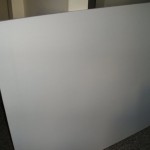
- Hang and project on your new $20 DIY projector screen.


