DIY Projects Guide
Your guide to DIY electronic, woodworking, camping projects and more
Many people are intimidated about doing their own car repairs. Most of the fear stems from lack of understanding about how their car operates and what it really takes to make the repair. For complex repairs, you may lack the knowledge, skill or tools to make the repair on your own. However, some simple auto maintenance, such as changing your own air filter, is well within reach of nearly any car owner.
First, how do you know you need a new air filter? Typically, you’ll find out when something goes, wrong when it’s listed in your car’s maintenance schedule or when the friendly oil change folks try to sell you an overpriced filter. You can usually check to see condition visually — a filter will look dirty even when fairly new, but if you look deep into the pleats, you’ll get a good sense if it is mostly surface grime or if the filter is full.
A clogged filter can rob your engine of horsepower and gas mileage, so you want to replace a clogged filter as soon as you can. Never operate the car without a filter installed. Most vehicles recommend replacing the filter ever 1-2 years or 12,000-20,000 miles.
You’ll need:
How does it work?
That’s all there is to it, you’ve now replaced your own car air filter and saved yourself money by doing it yourself.
Do you often wake feeling tired? Does the sound of your alarm clock buzzing drive you crazy? What if there were a better way?
Some people believe that your body reacts better when you wake to light– with a natural dawn simulation — easing your body into the day the way the sun does naturally.
Here’s a fun project you can do in just a few minutes given the right supplies. You can make your own wake-up light with a few simple items you may already own. Of course you could always buy one of these:
But if you’d rather be handy and make your own dawn simulator, here’s what you’ll need:
A digital wall timer is recommended, because most now offer programming customizable for 7 days– this lets you set different on/off patterns for weekdays vs. weekends, etc.
Once you’ve assembled your parts, you’re ready to get going on the path to simulating natural wake up patterns with your wake up light. If you’ve opted for a full spectrum bulb (one that is closer to the sun’s own light frequencies) install the bulb in your lamp).
Important note: If you plan to use a dimmer with this project, you may want to choose an incandecent bulb — newer CFL and LED bulbs are often not compatible with standard dimmer switches.
Next, if you are using a dimmer switch, plug your lamp into the dimmer switch. Then plug into the wall timer. If not using a dimmer switch, plug directly into the wall timer.
Then, plug in the wall timer to your outlet and program your on/off patterns using the provided instructions– each timer is different, but most allow for multiple on/off times per day and per week. Consider turning the light on before you plan to wake and leaving on for an hour or more to allow your body to adjust before you rise.
If you’ve installed a dimmer switch, test the brightness you’ve selected to ensure it is to your liking. Experiment with different settings until you find the level of light that helps you rise naturally without making you cringe.
There you have it, your very own wake up light – at a fraction of the cost of commercial dawn simulators.
Note, one advantage of the commercial models is the ability to integrate an alarm sound and to grow the light brighter over time — if you find difficulty getting brightness to your liking, consider a commercial model.
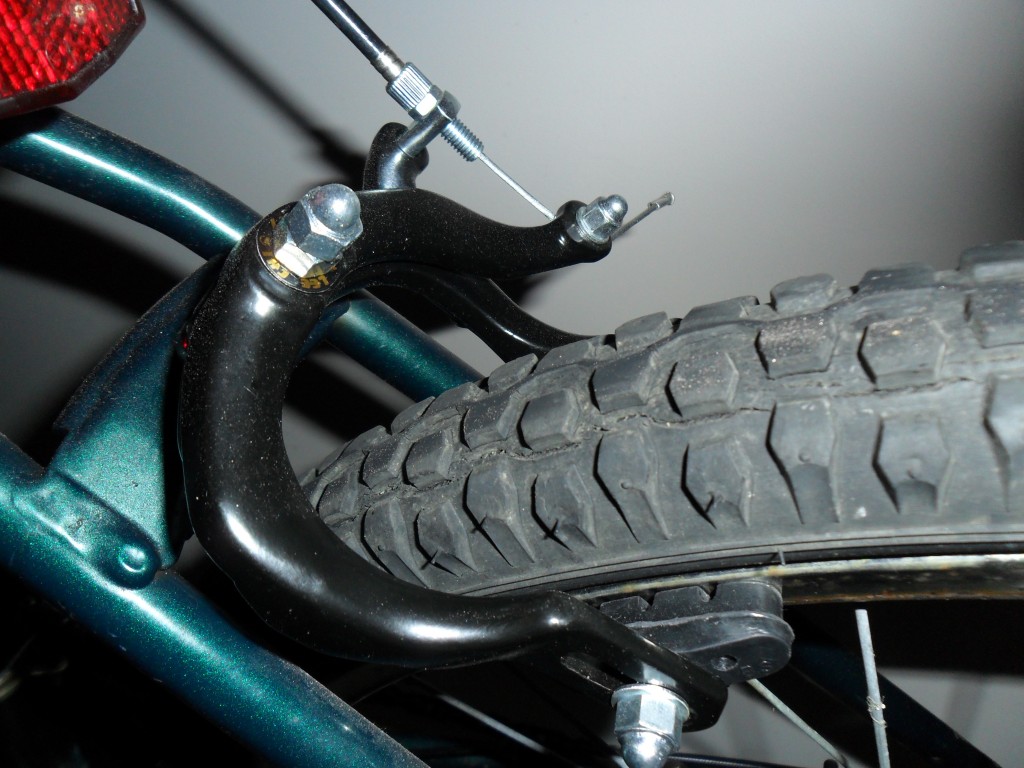 Here’s a simple project just about anyone can do in an hour or so. So you bike brakes won’t stop? Do the brake pads look worn down and uneven? Are the brackets themselves bent out of place? Rusted through?
You can easily replace side-pull caliper brakes yourself and make your bike safe to ride again. Note: properly functioning brakes are important to safe operation of a bicycle. Never operate a bicycle without properly functioning brakes. If you feel uncomfortable with your own ability to safely repair your own brakes, a neighborhood bike shop can do the repair for you.
If you’re interested in making the repair yourself, read on.
Materials:
Make sure that you purchase the correct components to fit your bicycle. There are several styles of brakes including disc brakes , side-pull brakes
, and V-brakes
. Make sure you purchase the correct size for your type of bike.
Step 1: Remove the old brakes. Start by loosening the bolt that holds the brake cable to the caliper; once removed, you should be able to fully separate the caliper releasing the brake pads from around the bicycle wheel. Next, loosen the bolt that holds the caliper assembly to the frame of the bike and remove the caliper entirely.
Step 2: If you are only replacing brake pads, now is the time to swap your new pads onto the calipers and re-install.
Step 3: If you are are fully replacing your calipers, install the new calipers paying close attention to the fit of the brake pads. You will likely need to adjust the placement of the brake pads to match your bicycle wheel. It’s also a good idea to clean your bike wheel to remove any dirt or grease that might cause problems for proper braking.
Step 4: Once the caliper is reattached, tighten the bolt and thread the brake cable through its place on the caliper. If the cable shows any signs of fraying, it should be replaced.
Step 5: Adjust properly. To properly adjust the brake cable tension, start with the brake lever fully released and the thumb screw adjustment at its lowest setting. Gently hold the brakes close to the wheel and tighten the screw holding the cable to the caliper.
Step 6: Test the brake operations by squeezing the brake lever. The brake should squeeze firmly, but release to allow free movement when the brakes are not applied. Use the thumb screw adjustment to find the right adjustment. Take time to adjust until the brakes operated properly. If you are unsure, consult a bike shop before operating your bicycle.
Step 7: Repeat the same steps to replace your second brake caliper.
Once you’re satisfied that the repair has been made properly, enjoy your handiwork with a relaxing safe ride.
So what exactly can you do with the $35 Raspberry Pi?
Well it turns out you can do lots of things! We’ll have more posts to follow, but the Raspberry Pi mini-computer is a low-power ARM-based microcomputer that can run alot of cool stuff through a linux distribution, including today’s project — an AirPrint Print Server.
So you have an Ipad, an Iphone, etc… and you noticed that ‘share’ option that says print — awesome right? Print right from my phone?
One catch, you don’t have an AirPrint compatibile printer and you like your current printer… no need to go out and buy an AirPrint printer.. Just turn you Raspberry Pi into an AirPrint Print server to relay your print jobs from Apple Ipad or iPhone to your existing printer.
Huge shout-out to Rohan for his original tutorial (http://rohankapoor.com/2012/06/configuring-the-raspberry-pi-as-an-airprint-server/) and tjfontaigne (https://github.com/tjfontaine/airprint-generate) for the python script that makes it possible for noobs.
Since that tutorial was made, the process of turning your Raspberry Pi into a AirPrint printer go between has become even easier. The latest versions of CUPS has added mDNS support that makes the process more streamlined.
The basic process goes like this:
1) Obtain a Raspberry Pi and a spare SD Card
2) Download WinImager32 (or your favorite image writer) and the raspbian linux distribution (http://www.raspberrypi.org/)
3) Write the linux image to your SD card and insert into your Pi. Boot and follow configuration menu… recommended to expand storage to fill card and change thee memory split to favor cpu usage ( GPU: 16Mb)
4) Update/upgrade your packages… you can do this by typing ‘sudo apt-get update’ and then ‘sudo apt-get upgrade’ — if you experience failures to any updates simply repeat until all installs are successful
5) Install CUPS (‘sudo apt-get install cups cups-pdf python-cups’); Then add your username to the lpadmin group to give access to manage the CUPS administration (‘sudo usermod -aG lpadmin yourusername’)
6) Next edit the configuration to allow yourself to manage CUPS from computers on your network outside of the Pi. (‘sudo nano /etc/cups/cupsd.conf’ will open it in an editor– Change “Listen localhost:631” –> “Port 631”; Add ‘ServerAlias *’ on the line following ‘DefaultAuthType Basic’; Add ‘Allow @Local’ under the server, admin and config files sections; Save changes.)
7) Add your printer using the CUPS web interface at the ip address of your Pi on port 631 – e.g. http://192.168.1.102:631 – Be sure to enable the option to share the printer you are adding.
8) Now that the Pi is configured to utilize your printer, it’s time to make it accessible as an Airprint server so your iOS devices will be able to print to your printer. Create a new directory /opt/airprint/; change to this directory (‘cd /opt/airprint/’) and download the script– ‘sudo wget -O airprint-generate.py –no-check-certificate https://raw.github.com/tjfontaine/airprint-generate/master/airprint-generate.py’ –then run the script: ‘sudo python airprint-generate.py’ — This should have created a new file with the name of your printer some random characters and ending ‘.service’ – If this file was generated correctly you should be all set.
9) On your iOS device, go to share on any page you want to print and select ‘print’ then select printer, your device should detect an airprint printer on your raspberry pi. Your Raspberry Pi will relay the print job directly form your iPhone as an AirPrint printer.
Enjoy!
Just recently found myself with some spare Cat 5 Cable so I took a look around the net for the best new uses for the old materials… Found a great site that details how to turn your old Cat5 into a high fidelity audio cable. Take your unneeded Cat 5 ethernet cable and make some useful high quality speaker cables. Haven’t tried it yet, but they look awesome- check it out over at http://www.venhaus1.com/diycatfivecables.html
Today’s project comes from Chris over at pyroelectro.com – They’ve got a ton of awesome projects you can check out, but today’s highlight is a new take on a classic line following robot. a great design and great write-up, you can check out at http://www.pyroelectro.com/projects/mini_tank and make your very own robot, and make it follow lines all over your house! I like the breadboard set up and the analog circuits, so you don’t even need a microcontoller. Amazing stuff! Now if we could get a light solar panel to recharge/replace the lipo battery, it could crawl lines each day for hours all on its own….
So you got a sweet lcd screen, or maybe you got a projector and built the DIY Projector Screen ? So now you wanna know how to hook up all your video sources and what cables to use. You also want to know what the differences are between cables and why some cables are cheap and some cables are expensive? do they make a difference? Here’s how to choose the right cables:
First, check what cables you can use. You’ll need a cable the fits the source, such as a dvd player or cable box, as well as the target, such as an lcd tv… There are a number of standards that are used. and here’s a break down:
After considering the available options that you can use to connect your components, consider the lengths of cables and costs. RF coaxial cable is probably the cheapest and will perform well over relatively long runs, but it is also the lowest quality picture… Composite cables may yield decent results in short runs of 3 to 6 ft, but will drastically suffer in runs 12ft-25ft or longer unless an extremely high quality 75 ohm cable with shielding is used. S-video may perform better but again, in longer runs, the quality will drop off dramatically. Component cables are likely included on your HD-ready source so this may be a good option, but consider HDMI for longer runs, where it’s available on source and target.

IF you want a nice workbench, you can make one yourself with just a few boards and some basic tools, inlcuding the Kreg Pocket Hole Jig System. Kreg has put together a great video series and here is episode one of how to make a workbench with the kreg jig. It’s a simple plan you can do in an afternoon or adapt to your own project. The video will give you ideas on how to use your kreg jig to build other tables and furniture.
Are you interested in how to grow tomatoes? Want to start from seeds and grow tomatoes? You can! With a little patience you can grow your very own tomato plants from seeds and be enjoying your very own tomatoes very soon!
What you need:
How to sprout tomatoes from seeds:
Do you have an old lamp sitting around the attic or basement that could be cleaned up and used? Is the problem that the electrics looks crazy old and need replacement? If you have an old lamp you want to rewire, you can easily rewire your lamp at home. Do it yourself and save money while saving the old lamp from the dump!
What you need:
How to rewire a lamp: